This tutorial will show you how to get a WordPress site in multiple languages and the translations with WordPress AutoTranslate easily.
Requirements
- Hosting
- WordPress
- MultilingualPress (plugin)
- WP AutoTranslate for MultilingualPress (plugin)
- Microsoft Translate API Key
Installation
The first thing you will do is create your new WordPress, a normal one. Previously, we have already set the data on the database. Your hosting may have the “one-click” installation option. You can use it!
When you go into your site, the first thing you will be asked for is the main language you are going to use. In this case, our main language will be English.
Fill in the name of the site, the main administrator user, the password and the email account. Click on Install WordPress.
Configuration
Next, you must activate the possibility that our site is a WordPress Multisite. Type in the wp-config.php file (via FTP or the system we want) and add the following line.
define( 'WP_ALLOW_MULTISITE', true );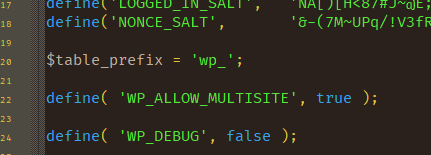
When we have updated the WordPress configuration file, we will enter WordPress and activate the WordPress MultiSite system.
Log in to WordPress and, once there, click on the Tools option in the menu and in Network Setup.
You must choose between sub-domains or folders, put the name you want to the network and the main mail.
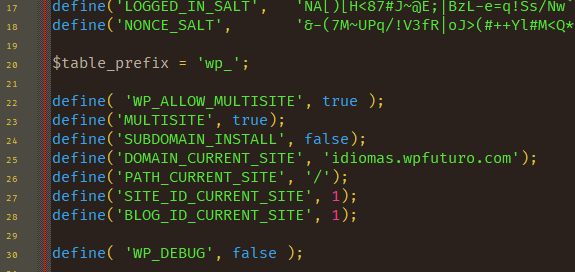
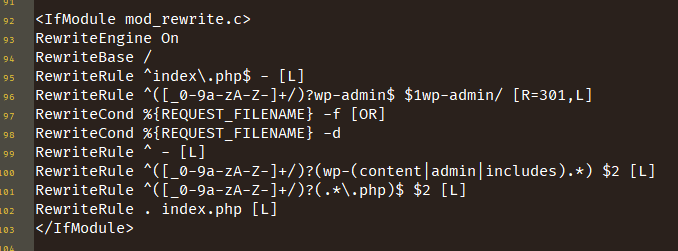
Once created, it will give you instructions to add to your wp-config.php and your .htaccess.
Add the information to wp-config.php as follows
Then, add the information to the .htaccess as follows
Once the files have been updated, return to the panel. Normally, you will be kicked out of the panel and asked to log in again with your username and password. Once you are logged in, you will already be in the installation of WordPress MultiSite, although only one site (the main one).
MultilingualPress
Before creating the new sites, install MultilingualPress, the plugin that allows you to attribute languages and relationships between the different sites. Once installed, activate it to make it functional.
Site creation
Now it is time to create the different sites. In this case, we will create a site in English, Spanish, French and German (the video only shows the last one created).
WP AutoTranslate
Now that you have created all the sites, install WordPress AutoTranslate for MultilingualPress. You must add the plugin at the network level and activate it.
Now you need to set up one of the translation providers. In this case, we are going to use Microsoft (following the following the steps to get the API details). Once we set up the Microsoft API, we activate it as the main translation provider.
Translating content
Now that you have everything, let’s create a new category for our publications. Create the category and introduce it to select the languages into which you want them to be translated. You will be able to click on some of them to check that they have been translated correctly.
We can go to any of the 4 languages that we have created to make the translation, it doesn’t have to be the main language of the installation. In this case our objective is to translate the Quixote from Spanish to other languages, so we are going to use Spanish as the source language.
Now that we have the category, let’s add the beginning of the first chapter as a Post. In the same way, we will translate it into the other languages.
End
And, that’s it! You have everything ready to set up your network of multilingual sites in a simple and easy way.